


Welcome to the next chapter of your bathroom remodeling journey! Mounting a vanity and toilet may seem like a daunting task, but with the right tools, a bit of patience, and our comprehensive guide, you'll have a bathroom that combines functionality and style. In this blog post, we'll walk you through the process of mounting both the vanity and toilet, ensuring a secure and aesthetically pleasing result.
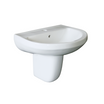
Mount the Vanity:
1.Gather Your Tools

Before you begin, make sure you have all the necessary tools and materials. This typically includes a level, drill, screws, a wrench, a pencil, and a measuring tape.
2.Locate and Mark the Studs

Use a stud finder to locate the wall studs. Mark these positions with a pencil. It's crucial to anchor your vanity to the studs for stability.
3.Position the Vanity

Place the vanity in its designated spot, ensuring it aligns with the wall studs. Use a level to make sure the vanity is perfectly horizontal. Make any adjustments as needed.
4.Secure the Vanity to the Wall

Drill pilot holes into the back of the vanity at the marked stud locations. Then, secure the vanity to the wall using screws. Double-check the level as you go to maintain proper alignment.
5.Connect Plumbing

If your vanity includes a sink, connect the plumbing. This may involve attaching the faucet, connecting water supply lines, and installing the drain. Follow the manufacturer's instructions for your specific vanity.
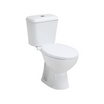
Mounting the Toilet:
1.Prepare the Area
Clear the area around the toilet and ensure the flange (the pipe fitting that connects the toilet to the drainpipe) is in good condition. Clean the flange and remove any debris.
2.Set the Toilet

Carefully lower the toilet onto the wax ring, aligning the bolts on the base with the holes in the flange. Apply even pressure to ensure a proper seal.
3.Secure the Toilet

Place a washer and nut onto each bolt and tighten them evenly. Be careful not to overtighten, as this can crack the toilet. Once secure, trim any excess bolt length.
4.Connect Water Supply

Connect the water supply line to the toilet tank. Tighten the connection by hand and then give it an extra quarter turn with pliers. Check for any leaks.
5.Install the Tank Lid

Place the tank lid on the toilet and ensure it fits securely. This step not only completes the installation but also adds a finishing touch to the toilet's appearance.
You've successfully mounted your vanity and toilet, taking a significant step towards transforming your bathroom. A well-mounted vanity and toilet not only enhance the aesthetics of the space but also contribute to a functional and comfortable environment. If you encounter any challenges during the process, don't hesitate to consult with professionals or refer to the manufacturer's instructions. Enjoy your newly elevated bathroom!


Leave a comment
This site is protected by reCAPTCHA and the Google Privacy Policy and Terms of Service apply.